Products
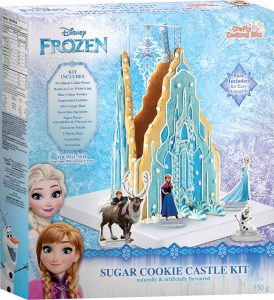
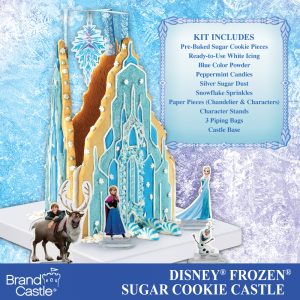
Disney® Frozen® Sugar Cookie Castle
-
Ice queen, Elsa, is joined by her sister and friends in this newly updated cookie castle.
UPC: 8-44527-03540-0
Net Wt: 19.4 oz (1lb 3.4oz) 550g -
Serving Size: 1/30 of package Serving Size Grams: 18g Servings Per Container: about 30 MIX PREPARED Calories: 80 110 Calories From Fat: 20 20 Total Fat: 2g 2g Total Fat (%): 3% 3% Saturated Fat: .5g .5g Saturated Fat (%): 2% 2% Cholesterol: 0mg 0mg Cholesterol (%): 0% 0% Sodium: 45mg 45mg Sodium (%): 2% 2% Total Carbohydrate: 13g 23g Total Carbohydrate (%): 4% 8% Sugars: 8g 17g Dietary Fiber: 0g 0g Dietary Fiber (%): 0% 0% Protein: <1g 1g Vitamin A (%): 0% 0% Vitamin C (%): 0% 0% Calcium (%): 0% 0% Iron (%): 2% 2% INGREDIENTS:Cookies: Enriched Wheat Flour (Wheat Flour, Niacin, Iron, Thiamine Mononitrate, Riboflavin, Folic Acid, Ascorbic Acid, Amylase), Sugar, Vegetable Shortening (Canola Oil, Modified Palm and Palm Kernel Oils), Corn Syrup, Baking Soda, Salt, Artificial Flavor.
Ready-to-Use Icing: Confectioners’ Sugar (Sugar, Corn Starch), Water, Vegetable Shortening (Hydrogenated Soybean and/or Cottonseed Oil), Corn Syrup, Food Starch-Modified (Corn), Salt, Mono and Diglycerides, Titanium Dioxide Color, Artificial Flavor, Citric Acid, Polysorbate 60, Potassium Sorbate (Preservative).
Peppermint Wheels: Sugar, Corn Syrup, Water, Artificial Flavor, Blue 1.
Sugar Dust: Sugar, Carnauba Wax, Shellac, Blue 1, Red 40, Titanium Dioxide Color, Yellow 5.
Blue Color Powder: Dextrose, Blue 1 Lake.
Snowflake Sprinkles: Sugar, Rice Flour, Partially Hydrogenated Vegetable Oil (Cottonseed or Soybean) and/or Vegetable Oil (Palm Kernel Oil and/or Palm Oil), Corn Starch, Gum Arabic, Cellulose Gum, Titanium Dioxide Color, Confectioner’s Glaze, Carrageenan, Soy Lecithin, Artificial Flavor.
CONTAINS:WHEAT AND SOY
-
You will need:
For Icing:
2 cups powdered sugar
2 TBSP + 2 tsp. milk
2 TBSP. light corn syrupoptional rimmed baking sheet for easy cleanup
**Adult supervision required. Read directions all the way through before beginning; iced pieces need time to dry once decorated.
PREPARE
Adults Carefully remove cookie pieces from packaging and lay out on a flat surface with smooth sides of cookies facing up. HINT: Always decorate cookies on the smooth side and assemble on the rough side. Combine powdered sugar, milk and corn syrup in a mixing bowl; whisk well until smooth. Insert a piping bag into a glass and pull over edges to hold open. Use a spoon to fill with approximately 1/3 cup of icing. Twist top to close, keep in glass, and set aside. HINT: Use a rubber band to help hold the top of the piping bag closed. Divide remaining icing into two bowls. Whisk 1/4 teaspoon blue color into one bowl until a light blue is obtained. Add enough remaining color to the other bowl and whisk until desired shade is obtained. Discard any remaining color powder. Fill piping bags with icings in same manner as above, twist tops to close, and set aside.ICE & DECORATE
Kids Empty sugar and snowflakes into small bowls. Place a cookie on a rimmed baking sheet.
Adults If desired, assist kids with crushing peppermint candies by placing in a plastic bag and smashing with a rolling pin. Transfer crushed candies to a small bowl. Cut a small tip off of the light blue piping bag. HINT: Start with a small tip, you can always make it larger.
Kids Fill in embossed areas of the cookie by applying gentle pressure and piping a thin layer of icing onto cookie. Use tip of the piping bag to help push icing over areas as desired. Refer to box for inspiration. A toothpick may be helpful to push icing into small corners. HINT: Do not apply icing thickly. Thinly spread icing dries faster. Immediately sprinkle sugar as desired. Turn cookie upside down and gently tap over rimmed baking pan to remove any sugar that fell on an undecorated part of the cookie. Place snowflake shapes and crushed peppermint (if using) onto wet icing. Repeat with remaining cookies and light blue icing.
Adult Place decorated cookies in the refrigerator for 10 minutes to allow icing to set. Icing must set 10 minutes in the refrigerator after each color application to avoid colors running together.
Kids Decorate cookies with darker blue icing, sugar, and candies in same manner. While the white icing was designed to outline castle pieces, it can be used to fill in embossed areas instead. ADULT HINT: Assist kids with any outlining only after blue icings have dried thoroughly. Make sure all decorated cookies have dried firm to the touch, 10 minutes in the refrigerator, before assembling the castle.BUILD
Adults Knead foil icing pouch for 1 minute to a smooth consistency. Cut the tip of the pouch to a 1/4-inch opening. Pipe a line of icing in the channels of the castle base. Squeeze a thick line of icing on the side of the straight edge of each of the cookie pieces. Refer to box for inspiration. Stand one castle piece into the base channel. Insert the next piece into the corresponding base channel and gently press together. Repeat with the last wall. Be mindful of the iced decorations on the castle pieces. Fold chandelier piece as marked and use a tiny bit of remaining icing to glue to the top of the cookie castle pieces. Leftover white icing can be squeezed onto the castle base to look like mounds of snow. HINT: Sprinkle coconut flakes (not included) over the castle base to create a frosty scene. Use icing to attach any remaining peppermint candies to base, if desired. If it will be necessary to move castle, allow it to set for 15 minutes first.
Kids Insert the character pieces into the clear character stands and arrange them around the castle. Admire and enjoy!Yield: 1 Frozen Sugar Cookie Castle
